Tutorial: Multi-Crane Lift Examples
Setting up the load and pick points tends to be the trickiest part of multi-crane lifts. These examples should be helpful.
Box Load
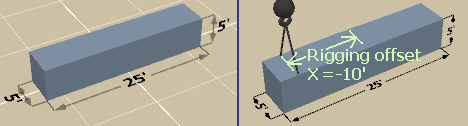
The first sample is a long box object. This example will apply to box, lattice, and custom 3D load objects. Our primary crane's
pick points are 10' from the center of the load, so we set Rigging Offset to -10' on the Rigging Details page.
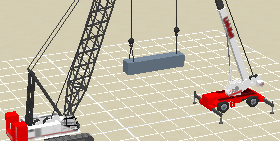
After adding the second crane, we position it in front of the primary crane by setting Center Pin X to 50' on the Lift Simulation page.
To lift over the rear end of the crane, set the Carrier Angle to 180 degrees. Then on the Multi-Crane page, we select the primary
crane and set the secondary crane lift mode as described above. Then set the secondary crane Pick Point X to 10' and your lift will
look like the image to the right.
Box Load positioned sideways
In 3D Lift Plan, all multi-crane lifts need to occur along the length of the load. In order to set up a lift where the cranes are
set up next to each other, you will need to rotate the load 90 degrees on the Load Details or Lift Simulation page.
Cylindrical Load
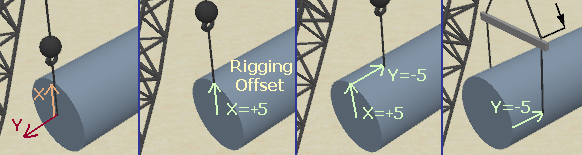
When lifting a cylindrical load, you will often need to set the Load Angle to 90 degrees to lay it sideways. This rotates the load's
coordinate system so the X dimension moves pick points up and down, and the Y dimension moves the pick points toward and away from the
crane. Some examples are shown to the right...
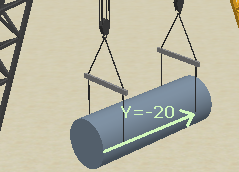
When setting up the secondary crane, you will typically need to set Pick Point Y to a negative number to move the pick point down towards
the bottom end of the load.